Have you ever plugged in your gaming headset only to find the mic completely dead while the audio works fine? If so, you've already discovered the core problem — and this guide exists to fix it. Learning how to use a single jack headset on a PC comes down to one hardware mismatch and a two-minute solution that most people overlook entirely. Whether you're gaming, on a video call, or recording audio, the answer is simpler than you'd expect. For more guides like this one, browse the tech and electronics section.

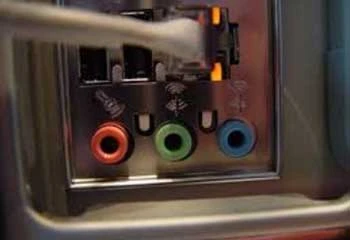
Most consumer headsets ship with a single TRRS connector — that four-striped 3.5mm plug carrying stereo audio and microphone signal on one cable. Standard desktop PCs, however, use two separate ports: pink for microphone input, green for headphone output. When you plug a TRRS headset into just one of those ports, the PC receives only half the signal. It doesn't know how to separate mic from audio without a little help.
The good news is that you have two reliable paths forward: a TRRS splitter adapter that splits one plug into two, or a combo audio jack if your machine already has one. Either way, the hardware fix takes under five minutes. The rest is a handful of OS settings. This guide walks through everything — mistakes to avoid, exact steps for both Windows and Mac, and how to build an audio setup that actually serves you long term.
Contents
Standard 3.5mm plugs come in two configurations. A TRS plug has three contact sections separated by two rings — it handles stereo audio on left and right channels. A TRRS plug adds a fourth section that carries the microphone signal. Most PC audio ports expect a TRS plug for headphones, not a TRRS, which means plugging a TRRS headset into the standard green port leaves the mic signal with nowhere to go.
There's a secondary wrinkle. According to the Wikipedia article on phone connectors, two competing TRRS standards exist: CTIA (used by Apple, most modern Android devices, and PC headsets) places the microphone on the fourth ring, while the older OMTP standard swaps the ground and mic positions. If your headset follows OMTP but your PC combo jack expects CTIA, even a direct plug-in won't activate the microphone without an inexpensive wiring adapter.
Knowing the mistakes upfront saves you from cycling through the same dead ends. Using a two-band TRS splitter instead of a four-band TRRS splitter is the single most common error — the two adapters look nearly identical in photos but behave completely differently. A TRS splitter sends no mic signal at all. The second mistake is plugging the headset into the headphone port only and expecting the mic to work. The third is adjusting hardware correctly but never updating the OS input device settings, so the PC keeps routing audio through its built-in microphone instead.
You need one piece of hardware: a TRRS 3.5mm headset splitter adapter, sometimes labeled a "mic splitter" or "headset Y-adapter." This adapter takes one TRRS input and breaks it into two TRS outputs — one for audio out, one for mic in. Confirm that the product listing explicitly mentions microphone support before buying; generic Y-splitters for duplicating audio to two headphones won't work here. Budget $5–$10 for a quality unit from a reputable brand. Cheap no-name versions occasionally have wiring defects that pass audio but cut the mic channel.
Check your PC's audio ports first. A desktop with a standard audio card has two rear ports (pink and green) plus optional front-panel ports. Many front-panel headers are wired as combo TRRS jacks. Laptops almost universally use combo jacks. If you see a single port with a headset icon — a circle with two ear cups — you already have a combo jack and need no adapter at all.
Plug your TRRS splitter into the headset's single jack. The adapter outputs two plugs. Insert the pink-tipped (mic) plug into your PC's pink port and the green-tipped (audio) plug into the green port. That's the hardware side complete. Your headset now has its signals routed correctly. The next step is confirming that Windows or Mac points to the right input device — the hardware fix alone isn't always enough.
Plug your headset directly into the combo audio jack. No splitter is needed. On most modern systems the OS detects both audio output and mic input automatically. If the mic remains silent after plugging in, verify whether the combo port uses CTIA or OMTP wiring. Older laptops and some budget desktops use OMTP. A CTIA-to-OMTP adapter costs $3–$5 and resolves the incompatibility instantly — the pins are simply rewired to match what your port expects.
Right-click the speaker icon in your system tray and select "Open Sound Settings." Under the Input section, open the dropdown and select your headset microphone — it typically appears as "Microphone (Realtek High Definition Audio)" or a similar label. Click "Device Properties" and confirm it isn't muted. Set input volume to 80–90% as a starting baseline, then use the built-in microphone test to verify signal.
If nothing appears under Input, open the legacy Sound Control Panel (search "Sound" in Control Panel), click the Recording tab, right-click anywhere in the device list, and enable both "Show Disabled Devices" and "Show Disconnected Devices." Your headset mic may appear there as disabled. Right-click it and select "Enable." This step catches the majority of cases where the hardware is correct but the device remains invisible in the modern settings panel.
On macOS, open System Preferences → Sound → Input and select the headset microphone from the device list. Adjust the input volume slider to roughly 75–85%. On macOS Ventura and later, navigate to System Settings → Sound → Input instead. Some Macs display an automatic popup when a new audio device is inserted, asking whether it's a headset or a standard headphone. Always select "Headset" — this is the step that activates the microphone channel on the combo jack.
Pro tip: On both Windows and Mac, unplug and replug the headset after changing any audio settings — the OS refreshes the device list immediately on reconnect and picks up your changes faster than waiting for an automatic scan.
A TRRS splitter is the right permanent solution for casual gaming, Discord voice chat, Zoom calls, and everyday communication. If your headset sounds good and the mic meets your quality needs, there is no reason to spend more. The splitter also makes sense when you're testing whether a specific headset is worth keeping before committing to it long term. Keep one in your desk drawer — it's the kind of $7 accessory that solves a problem on the spot.
For gamers building out a full PC peripheral setup, pairing a clean audio chain with the right display makes a meaningful difference. Our guide on how to choose a gaming monitor for PC or console covers refresh rates, panel types, and resolution trade-offs. If you're building a media room rather than just a gaming desk, setting up a home theater system on a budget covers speakers, receivers, and room acoustics without requiring a large investment.
USB headsets bypass the PC's onboard audio chipset entirely, routing signal through the USB controller for a cleaner, more consistent result. For streaming, podcasting, or professional video calls, that matters. USB also eliminates the driver and port-compatibility headaches that come with 3.5mm adapters. If you find yourself constantly fighting with audio settings, a USB headset is the permanent fix, not another adapter.
Wireless is worth considering too. If cable management is a pain or you move around your workspace, a quality pair of wireless earbuds with noise canceling may serve you better than any wired setup. And if you're regularly connecting your PC to other displays or devices, our guide on playing Xbox One on a laptop screen with HDMI covers the broader landscape of peripheral compatibility on consumer hardware.
| Use Case | Best Solution | Approx. Cost | Audio Quality |
|---|---|---|---|
| Casual gaming, voice chat | TRRS splitter adapter | $5–$10 | Good |
| Laptop with combo jack | Direct plug-in, adjust settings | $0 | Good |
| OMTP wiring conflict | CTIA-to-OMTP adapter | $3–$5 | Good |
| Streaming or podcasting | USB headset | $40–$100 | Very Good |
| Professional meetings | USB headset or standalone mic | $50–$150 | Excellent |
| Wireless convenience | Bluetooth headset | $30–$200 | Good–Excellent |
Audio driver problems cause more undetected mic failures than any hardware fault. On Windows, open Device Manager, expand "Sound, video and game controllers," right-click your audio device, and select "Update driver." For Realtek-based motherboards — the most common onboard audio chipset — download the driver directly from Realtek's website rather than relying on Windows Update. Manufacturer-direct drivers include better device detection, improved noise floor performance, and fix known issues with TRRS combo jack recognition that Windows Update versions sometimes miss.
Mismatched sample rates are a hidden source of audio degradation and dropouts. If your mic defaults to 44,100 Hz but your application or output device expects 48,000 Hz, you'll hear subtle warping or choppy audio. In Windows, right-click your microphone in the Sound Control Panel, go to Properties → Advanced, and set the default format to "2 channel, 16 bit, 48000 Hz." Do the same for your headphone output device. Keeping both on the same sample rate eliminates a class of problems that no amount of driver updates will fix.
Hardware and settings can be perfect while poor mic placement still tanks your audio quality. A boom mic should sit roughly two inches from the corner of your mouth, not directly in front — direct positioning amplifies plosive sounds on "p" and "b" words that spike your audio and distort recordings. If your headset uses an inline mic on the cable, keep it on the side of your dominant hand so it naturally hangs closer to your face. For voice calls, this single adjustment often makes a bigger difference than any equipment upgrade.
A standard budget gaming desk: a mid-range PC with Realtek onboard audio, a $35 gaming headset with a single TRRS jack, and a $7 TRRS splitter. The splitter goes into the headset, pink plug into the pink port, green plug into the green port. Windows configured to use the Realtek mic input with volume at 85%. Result: clear in-game voice chat, no static, no echo. The entire hardware fix cost $7 and took four minutes to set up.
This is the same principle at work whenever a small, inexpensive adapter bridges a compatibility gap between two systems built to different standards. For anyone building out a full gaming workstation, pairing this audio fix with the right keyboard makes the peripheral setup complete — our guide on choosing a mechanical keyboard for gaming or typing walks through switches, form factors, and key features worth paying for.
Remote workers on video calls face a different problem: inconsistent mic levels and background noise that make them sound unprofessional regardless of their headset. A single-jack headset plugged into a laptop's combo jack handles the hardware side cleanly. The software layer matters just as much — applications like Krisp or NVIDIA RTX Voice apply real-time noise filtering that works independently of your headset hardware. Combining a properly configured TRRS connection with noise suppression software produces audio quality that rivals a dedicated USB microphone at a fraction of the cost.
Someone starting a YouTube channel or podcast doesn't always have budget for a professional mic setup. A gaming headset running through a USB audio interface — which accepts a 3.5mm TRS input and converts it to USB — gives you independent gain control, better preamp circuitry, and DAW compatibility with Audacity or GarageBand. A basic interface runs $20–$40 and opens the door to standalone microphone upgrades later without rerouting your entire desk. Creators who also shoot video alongside audio will find our guide on choosing an action camera for outdoor adventures useful for building a complete recording setup. And if you're drawn to hardware tinkering, getting started with 3D printing at home opens up custom mic arm mounts, cable clips, and desk accessories you won't find in stores.

The TRRS splitter is a legitimate permanent solution if your needs stay in the casual-to-moderate range. But if your use is growing — more streaming, more professional calls, more recorded content — plan your upgrade path before you find yourself layering adapters on top of adapters. A USB audio interface is the most versatile long-term investment for anyone who might eventually want a standalone microphone, better headphone amplification, or multi-track recording capability. Buying one interface now is more cost-effective than buying two or three successive adapters.
Audio ports on desktop PCs wear out with repeated daily plugging and unplugging. If you disconnect your headset every time you step away from your desk, use a short extension cable or a desktop USB audio hub with a 3.5mm combo jack to absorb that wear instead of your motherboard's port. These hubs cost $15–$25 and give you a replaceable interface that you can swap independently without touching your PC's internals.
Cable longevity matters too. Headset cables fail most often at the connector, particularly when they're bent sharply or pinched under a chair wheel. A Velcro tie, adhesive cable clip, or simple under-desk routing guide protects the cable at its vulnerable points and extends its life significantly. These are small habits that protect a $50 investment for years of reliable use.
Onboard Realtek audio handles the majority of use cases well, but if you notice persistent static, ground hum from nearby components, or interference when scrolling or loading content, those are signs your onboard chip is picking up electromagnetic noise from the motherboard. A dedicated PCIe soundcard eliminates those issues at the hardware level. Mid-range cards from ASUS Xonar or Creative Sound Blaster include their own amplifier circuits, TRRS combo jacks, and software equalizers. Expect to spend $40–$80 for a card that makes a clear, audible improvement in both listening quality and microphone clarity — a worthwhile investment if you spend hours daily in voice communication or audio work.
Yes — if your PC has a combo audio jack that accepts a TRRS plug, you can plug the headset directly in. Many laptops and newer desktop front panels include this. If your PC only has separate pink and green ports, a TRRS splitter adapter is required to route both audio and mic signals correctly.
Smartphones are designed around the TRRS standard and recognize both audio and microphone signals from a single jack automatically. Most desktop PCs use separate TRS ports that don't read the microphone ring on a TRRS plug. A TRRS splitter bridges this gap, or you can use the PC's front-panel combo jack if one is present.
A TRRS splitter takes one four-contact plug and outputs two separate plugs — one for audio, one for microphone. A TRS splitter duplicates a three-contact audio signal to two headphones. Only a TRRS splitter carries microphone data. Using a TRS splitter for this purpose will give you audio but a completely silent microphone.
Input volume is almost certainly set too low. Open Sound Settings, select your microphone device, go to Device Properties, and raise the input volume slider to 80–90%. Also check that microphone boost is enabled in the Advanced Sound Options — Windows allows an additional +10 to +30 dB boost for microphones with naturally low output levels.
A USB audio adapter bypasses the PC's onboard audio chipset and uses its own analog-to-digital converter, which typically produces a cleaner, lower-noise signal. For casual use the difference is minor. For recording, streaming, or professional calls, the improvement is noticeable — reduced static, more consistent levels, and better compatibility with professional audio software.
This is a feature called "microphone monitoring" or "sidetone" — the PC routes a portion of your mic input back through your headphones in real time so you can hear yourself speak. Disable it in Windows by right-clicking your microphone in the Recording tab, selecting Properties, going to the Listen tab, and unchecking "Listen to this device."
Yes. The hardware setup is identical — use a TRRS splitter for separate jacks or plug directly into a combo jack. On Mac, go to System Preferences → Sound → Input and select the headset microphone as your active input device. The wiring standards are the same across both platforms, so the same adapter that works on Windows works on Mac.
Static usually points to three causes: a loose connection at the jack or splitter, a sample rate mismatch between your mic and output device, or electromagnetic interference from nearby components. Reseat all connections firmly, match sample rates to 48,000 Hz on both devices in Sound settings, and try plugging into the rear panel audio ports instead of the front panel — rear ports connect directly to the motherboard's audio circuit with less cable routing that can pick up interference.


About Lindsey Carter
Lindsey and Mike C. grew up in the same neighborhood. They also went to the same Cholla Middle School together. The two famillies from time to time got together for BBQ parties...Lindsey's family relocated to California after middle school. They occasiotnally emailed each other to update what's going on in their lives.She received Software Engineering degree from U.C. San Francisco. While looking for work, she was guided by Mike for an engineering position at the company Mike is working for. Upon passing the job interview, Lindsey was so happy as now she could finally be back to where she'd like to grow old with.Lindset occasionally guest posted for Mike, adding other flavors to the site while helping diverse his over-passion for baseball.
You can get FREE Gifts. Or latest Free phones here.
Disable Ad block to reveal all the info. Once done, hit a button below
 im
im