Last spring, a friend handed me his gaming PC in a grocery bag — fans still spinning, no display, no response. When I cracked the case open, the motherboard looked like the inside of a vacuum cleaner bag. That moment made something very clear: most PC owners have no idea how to clean a motherboard properly, and it's costing them real money in premature hardware failures. Whether you're maintaining a gaming rig, a home workstation, or just trying to squeeze more years out of an aging build, this guide covers everything. For more guides on getting the most from your tech, visit our tech and electronics section.

A motherboard collects dust, skin oils, and airborne debris continuously. That buildup traps heat, increases electrical resistance, and can eventually cause shorts. According to Wikipedia's overview of motherboard architecture, these PCBs house dozens of tightly integrated components — all of which perform better and last longer when they're clean. The good news is that with the right tools and a little patience, this is a job you can handle entirely at home.
This guide walks you through five proven cleaning methods, explains which approach fits your situation, and flags the mistakes that turn a simple maintenance task into an expensive hardware disaster. By the time you finish, you'll know exactly what to do — and what to never do — when cleaning your motherboard.
Contents
Cleaning a motherboard isn't complicated, but it demands respect. You're working with delicate traces, capacitors, and solder joints that don't tolerate rough handling or moisture. Getting the process right starts before you ever touch a component.
You don't need a professional electronics lab — but you do need the right supplies. At minimum, gather these before you start:
Do your cleaning in a low-humidity room. Moisture in the air is your enemy when working with exposed electronics. Lay down a clean, non-conductive surface — an anti-static mat is ideal, but a clean wooden table works in a pinch. Set everything out before you open the case so you're not hunting for tools mid-job.
Never clean a motherboard while it's in a powered or even plugged-in system. Shut down completely, unplug the power cable from the wall, then press the power button once to discharge residual charge in the capacitors. If you're removing the board to clean it, handle it by the edges only — fingertips on the PCB surface deposit oils and can create micro-conductivity issues over time.
Ground yourself with an anti-static wrist strap before touching any component. Static discharge is invisible and silent, but it can kill a motherboard instantly. This is not optional. It takes five seconds and can save your entire build.
Pro tip: Touch a bare metal part of your PC case before handling any components to discharge static — especially if you don't have a wrist strap immediately available.
There isn't one universal best way to clean a motherboard. The right method depends on how dirty the board is, whether it's still installed in the case, and your comfort level with electronics. Here's a full breakdown of all five approaches.
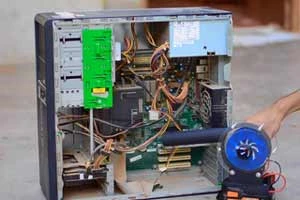
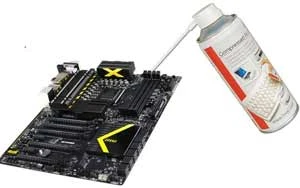
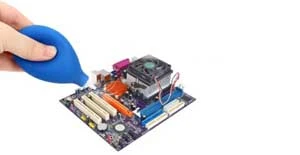
This is your first-line method for routine maintenance. Compressed air blasts loose dust out of heatsink fins, RAM slots, and PCIe connectors without any physical contact. Hold the can upright to prevent liquid propellant from spraying onto the board, and keep bursts short — two to three seconds each. An electric blower is a smarter long-term investment: no propellant risk, no running out mid-clean, and you can dial in the pressure.
Use this method every three to six months as part of your regular PC upkeep. It handles the majority of dust buildup without any risk to components. If you're someone who takes care of a range of electronics at home, you'll find similar logic applies elsewhere — keeping dust off AV receivers and amplifiers extends their lifespan just like a well-maintained PC, as anyone who's read about setting up a home theater system on a budget will recognize.
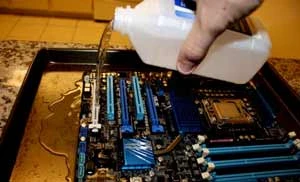
For stubborn grime, thermal paste residue, or early-stage corrosion, isopropyl alcohol at 99% concentration is the correct tool. Apply it to a cotton swab or lint-free cloth, then scrub the affected area in small, controlled motions. IPA evaporates quickly and leaves no residue — exactly what you want on a PCB.
Do not use standard rubbing alcohol from the pharmacy. Anything below 90% concentration contains enough water to cause oxidation on copper traces. The extra few dollars for high-purity IPA is worth it every single time.
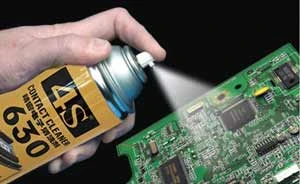
Thinner solvent handles flux residue and heavy contamination that IPA won't shift, but it's an aggressive chemical. Use it sparingly and only as a last resort — and always let the board air dry completely before reconnecting power. Dedicated electronics cleaning sprays, commonly labeled as contact cleaner, are formulated to be safe on PCBs and evaporate fast. They're a reliable choice when you need something more targeted than IPA but less aggressive than thinner.
A hand vacuum set to its lowest suction pulls dust from tight spaces without the blast-scatter risk of compressed air. Never use a full-size household vacuum — the static charge that builds on a regular plastic nozzle can discharge directly into your components and cause irreversible damage.
| Method | Best For | Risk Level | Approximate Cost |
|---|---|---|---|
| Compressed Air / Blower | Routine dust removal | Low | $8–$30 |
| Isopropyl Alcohol (99%) | Grime, thermal paste, light corrosion | Low–Medium | $5–$10 |
| Thinner Solvent | Flux residue, heavy contamination | Medium–High | $8–$15 |
| Cleaning Spray (Contact Cleaner) | PCB contacts and connectors | Low–Medium | $10–$20 |
| Anti-Static Hand Vacuum | Localized debris removal | Low (if anti-static rated) | $15–$40 |
Cleaning your board once solves today's problem. Building habits that prevent buildup solves every problem going forward. The real goal isn't damage control — it's consistent maintenance that keeps performance high and temperatures low.
For most home users, a compressed air pass every three to six months is sufficient. If you have pets, smoke indoors, or live in a dusty climate, move to every two to three months. Mark it on your calendar the same way you'd schedule an oil change. Consistent light maintenance beats intensive emergency cleanings every time.
Pair motherboard cleaning with other PC tasks: reseat thermal paste annually, clean GPU fans, inspect case dust filters. The same disciplined approach that makes detailing a car at home like a professional effective applies directly here — regular care compounds over time and prevents the kind of degradation that causes failures.
Where you place your PC matters as much as how often you clean it. Tower cases sitting directly on carpet act like dust vacuums — the electrostatic charge in carpet fibers actively draws particles into your case intakes. Lift the case off the floor with a platform or small stand. Setting your case to positive air pressure, meaning more intake fans than exhaust, forces air out through gaps and prevents unfiltered air from being pulled in through seams. Clean your case dust filters once a month — it takes under a minute and makes a measurable difference in internal temperatures.
Warning: Placing your PC directly on carpet dramatically increases dust intake and static discharge risk — always elevate the case on a hard, non-conductive surface.
Not every cleaning job is the same. A first-time PC owner maintaining a lightly used machine needs a fundamentally different approach than an enthusiast doing a full teardown on a system that hasn't been opened in three years. Matching your method to your experience level prevents accidents.
If you've never opened your PC before, start with compressed air and the motherboard still in the case. You don't need to remove it for routine cleaning. Open the side panel, hold your fans stationary with a finger or pencil to prevent them from spinning freely, and blow out dust in short controlled bursts. That's the entire job. You'll see an immediate improvement in temperatures without any risk from improper component handling.
If you're newer to PC hardware more broadly, building familiarity with related peripherals helps. Guides like how to use a headset mic on PC with one jack or how to choose a gaming monitor for PC or console give you a wider understanding of how your hardware ecosystem connects — and what's worth maintaining carefully.
Advanced cleaning means removing the motherboard from the case entirely. This gives you access to every corner — the back side of the PCB, tight areas near the CPU socket, and spots blocked by the chassis. Use IPA with a soft brush to scrub contact pads, clean out PCIe and RAM slots, and remove old thermal interface material before reapplication. Work systematically from one end of the board to the other so you don't miss any area.
If you also work on maker projects or tinker with electronics broadly — say, you're interested in getting started with 3D printing at home — you'll find the same methodical, precision-focused mindset transfers directly. And whether you're handling vintage hardware or connecting a Bluetooth headset to a PS3, these same anti-static habits protect every piece of electronics you touch.
Most motherboard damage during cleaning is entirely self-inflicted. The cleaning methods are simple — the mistakes are simpler. Knowing what to avoid is half the battle.
Never spray any liquid directly onto a mounted motherboard. Apply liquids to your applicator — a swab or cloth — and then to the board. Pooling liquid in a capacitor recess or connector is a reliable path to a short on the next boot. Static electricity is equally dangerous. A discharge you can't feel or hear is still strong enough to destroy ICs instantly. Static electricity is the silent killer of electronics. Treat every handling session as a potential risk and use your wrist strap without exception.
And never use water — not tap water, not distilled water, not water for any reason. IPA at 99% is the correct wet-cleaning agent for circuit boards, full stop. Water and electronics have one relationship: water destroys electronics.
If you've used IPA or any cleaning solution, the board must dry completely before you restore power. IPA evaporates in minutes under normal conditions, but liquid trapped under heatsinks or inside headers takes longer. Wait at least 30 minutes after any wet cleaning before reconnecting power. For a heavier cleaning session, wait a full hour. Propping the board vertically lets residual liquid drain away from connectors and speeds the process.
Impatience at this step is exactly how people fry hardware immediately after cleaning it. The same patience you'd apply to learning how to play Xbox One on a laptop screen with HDMI for the first time — following each step in order before powering on — applies directly here. Skip ahead and you undo all the work you just did.
For most users, every three to six months is the right interval. If you have pets, live in a dusty climate, or smoke indoors, clean every two to three months. A quick visual inspection monthly takes only seconds and tells you if buildup is happening faster than expected.
Yes. For routine dust removal with compressed air, you don't need to remove the board at all. Open the side panel, hold fans stationary, and blow dust out in short bursts. Full removal is only necessary for deep cleaning with IPA or when you need access to the back of the PCB.
No. Water — including distilled water — should never be used on a motherboard. It leaves mineral deposits and causes oxidation on copper traces. Always use 99% isopropyl alcohol for any wet cleaning work on circuit boards.
Use 99% isopropyl alcohol. Anything below 90% contains enough water to increase oxidation risk on copper traces and solder joints. Standard 70% rubbing alcohol from the pharmacy is not appropriate for cleaning circuit boards.
Yes. Dust acts as thermal insulation, trapping heat around capacitors, MOSFETs, and ICs. Sustained elevated temperatures degrade components over time. Dense dust deposits can also bridge electrical contacts and cause intermittent or permanent shorts. Regular cleaning directly extends hardware lifespan.
For compressed air cleaning it isn't strictly necessary, but removing them gives better access and lets you clean slots thoroughly. If you're using IPA, removing components prevents accidental liquid contact with connector pins and speeds up the drying process significantly.
Cleaning your motherboard is one of the simplest, highest-return maintenance habits you can build as a PC owner. Pick the right method for the job, take the anti-static precautions seriously, and always let the board dry completely before powering back on. Grab a can of compressed air this weekend, crack your case open, and give your hardware the attention it deserves — fifteen minutes of maintenance now is worth far more than a motherboard replacement later.


About Lindsey Carter
Lindsey and Mike C. grew up in the same neighborhood. They also went to the same Cholla Middle School together. The two famillies from time to time got together for BBQ parties...Lindsey's family relocated to California after middle school. They occasiotnally emailed each other to update what's going on in their lives.She received Software Engineering degree from U.C. San Francisco. While looking for work, she was guided by Mike for an engineering position at the company Mike is working for. Upon passing the job interview, Lindsey was so happy as now she could finally be back to where she'd like to grow old with.Lindset occasionally guest posted for Mike, adding other flavors to the site while helping diverse his over-passion for baseball.
You can get FREE Gifts. Or latest Free phones here.
Disable Ad block to reveal all the info. Once done, hit a button below
 im
im