Knowing how to remove paint from car surfaces correctly saves you hundreds of dollars and prevents permanent damage to your finish. Whether you're dealing with a parking lot scuff, fresh overspray, or paint transfer from another bumper, most of these problems are fixable at home with the right approach. Browse our automotive guides for more car care tips from our team.
The key is matching the right method to the type of damage in front of you. Go too aggressive and you'll cut through your clear coat — the transparent protective layer over your car's color. Go too gentle and you'll waste time with nothing to show for it. This guide walks you through every proven method, from a simple clay bar treatment all the way to wet sanding, so you can pick what actually fits your situation.
You don't need a professional detailer for most of these jobs. A few targeted products, the right technique, and a little patience are all it takes to get your car looking clean again.
Contents
Not all paint problems are the same, and the method that works on one type will completely fail on another. Before you grab any product, identify exactly what you're dealing with.
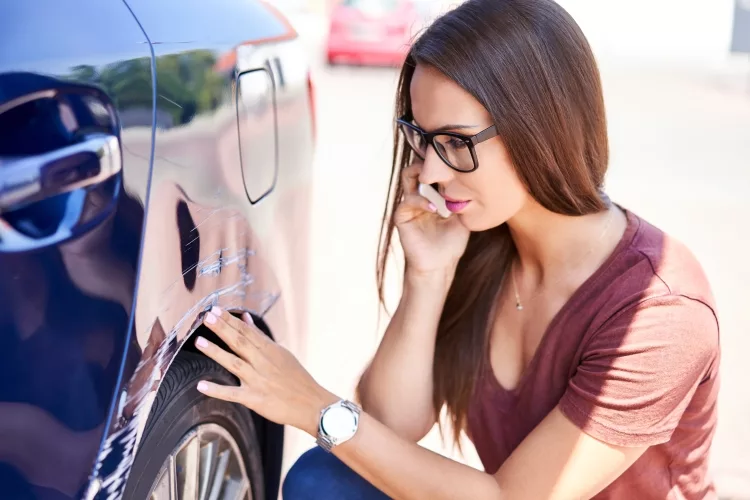
Paint transfer happens when another object physically rubs its paint onto your car. Think shopping carts, tight parking garages, or another bumper tapping yours. Your car's original paint is usually untouched underneath — the foreign paint is sitting on top of your clear coat, not scratched into it.
Overspray is airborne paint that drifts onto your car from a nearby source — a construction crew sealing pavement, a neighbor repainting a fence, or road marking crews. It typically feels rough or gritty to the touch and appears as a hazy film or tiny speckles scattered across panels.
Spray paint vandalism bonds aggressively to surfaces and usually requires chemical solvents. The good news is that even thick graffiti can come off without stripping your factory finish if you move quickly and use the right product. Don't scrub dry — you need a solvent that dissolves the foreign paint before it moves.
Pro tip: Before touching any graffiti, photograph it from multiple angles — your insurance company will want documentation before processing any claim.
These four methods are ordered from least aggressive to most aggressive. Always start gentle and escalate only when needed. Jumping straight to the most aggressive option is how minor transfer becomes a panel respray.
A clay bar is a malleable block of detailing clay that physically lifts surface contaminants off your clear coat without abrading it. It's the safest starting point for light paint transfer, fresh overspray, and industrial fallout.
Step-by-step:
Clay bars work well for overspray and light transfer. They won't do much against thick, deeply bonded paint.
A rubbing compound (also called a cutting compound) is a mildly abrasive paste that removes a microscopic layer of clear coat along with the transfer sitting in it. More aggressive than clay, but safe when applied correctly.
This is the go-to method for most parking lot scuffs. It handles the majority of paint transfer situations without escalating to anything riskier.
Chemical removers — acetone, lacquer thinner, WD-40, or dedicated automotive paint transfer products — dissolve the foreign paint through chemical action rather than abrasion. They work fast but need careful handling.
When abrasive methods are needed on surrounding surfaces, the right grit selection matters enormously. Our guide to sandpaper for removing paint covers grit levels and technique in detail — much of that knowledge applies to automotive work as well.
Wet sanding uses ultra-fine sandpaper soaked in water to level out damaged clear coat. Reserve this for deep paint transfer that resists every other method — it removes a real layer of your finish.
Done wrong, wet sanding leaves swirl marks or cuts through to the base coat. If you're not confident, stop at the rubbing compound step and let a professional handle the rest.
Warning: Always test any chemical or abrasive method on a hidden spot — like inside a door jamb — before working on a visible panel. What's safe on one paint formulation can damage another.
The price range for paint removal runs from under $10 for a tube of rubbing compound to several thousand dollars at a body shop. Here's a realistic breakdown so you know exactly where your money goes.
Going the DIY route is almost always the right call for transfer paint and overspray. The products are cheap, and you can get professional-quality results with practice.
| Method | Product Cost | Difficulty | Best For |
|---|---|---|---|
| Clay Bar Kit | $10–$20 | Easy | Overspray, light surface transfer |
| Rubbing Compound | $8–$25 | Easy–Moderate | Paint transfer, parking scuffs |
| WD-40 or Automotive Solvent | $5–$15 | Easy | Fresh transfer, graffiti |
| Wet Sanding Kit | $15–$40 | Advanced | Deep transfer, oxidized clear coat |
| Complete Detail Kit | $40–$80 | Moderate | Full paint correction job |
For most drivers, a $15–$25 investment in a clay bar kit plus rubbing compound covers the vast majority of paint problems you'll ever encounter. Drivers who stay on top of their vehicles — like truck owners who research the best shocks for 4×4 trucks to keep everything running right — already know that small preventive investments pay off far more than reactive repairs.
When damage is too severe for DIY, a body shop or professional detailer is the answer. Here's what to expect:
For technical background on how automotive clear coat layers work and what professional correction actually involves, the Wikipedia article on automobile paint is a solid reference. Always get at least two quotes before committing to professional work, and ask to see examples of similar jobs they've completed.
Knowing the methods is half the battle. Knowing which one to reach for in your specific situation is the other half. Here are the most common real-world scenarios with a direct action plan for each.
The situation: A shopping cart tagged your door in a parking lot. There's a white or gray smear but no visible dent or deep gouge in the surface.
This is the most common scenario, and the fix is fast:
Most light transfer jobs take under 30 minutes. Drivers who stay organized about car maintenance — checking battery health with the right battery hydrometer, topping up fluids on schedule — tend to already have the basic products in the garage to handle this on the spot.
The situation: Your car was parked near a construction zone and now has a rough, hazy film across the hood and roof. Or you got sideswiped and the transfer is thick, layered, and deeply embedded in the clear coat.
Overspray that has been sitting for more than a week is significantly harder to remove — it cures and bonds much more tenaciously. Act fast when you discover it. Car enthusiasts who care about their vehicle's appearance inside and out — the type who look into how to make their car louder and stay dialed in on every detail — know that the exterior is just as important as what's under the hood.
Removing the damage is only half the job. Protecting your finish after the fact — and going forward — prevents future problems from escalating into expensive repairs.
A layer of wax or synthetic sealant acts as a sacrificial barrier between contaminants and your clear coat. Foreign paint, bird droppings, and road grime bond to the wax instead. When they hit a properly waxed surface, they wipe away cleanly instead of etching in.
Best practices for waxing:
Carnauba wax delivers a warm, deep gloss. Synthetic sealants last considerably longer. For maximum protection, layer them: sealant as a base coat, carnauba wax on top.
Paint protection film (PPF) — commonly called a "clear bra" — is a thick, transparent urethane film applied directly over your paint. It's the strongest available protection for high-impact areas like the front bumper, hood leading edge, and side mirrors.
If you park in tight lots regularly or live near active construction, PPF pays for itself quickly. Pair it with regular waxing and your car will deflect most of the paint transfer situations this guide covers.
Most paint removal disasters are completely avoidable. These are the errors that take a simple fix and turn it into an expensive professional job.
Stick exclusively to products formulated for automotive paint. If the label doesn't specify car use, don't apply it to your finish.
Working on a dirty surface is the single most common mistake. Any grit or dust on the panel becomes sandpaper the moment you start rubbing — scratching the very clear coat you're trying to save.
Always complete these steps before starting:
Using dirty applicators is just as bad as a dirty car. A clay bar that has picked up grit, or a foam pad that's been sitting uncovered in the garage, will scratch your paint. Always use fresh, clean applicators. The principle that quality tools and proper prep matter applies across every hands-on discipline — as covered in our guide to the best bench chisels, where preparation and the right equipment make the difference between a clean result and a ruined workpiece.
Yes — WD-40 is one of the most effective and safest first-line treatments for fresh paint transfer. Spray it directly on the scuff, let it sit for 30 seconds, then wipe with a microfiber cloth. It dissolves the surface bond of the foreign paint without damaging your clear coat. It works best on transfer that is less than a few days old.
Used correctly, rubbing compound removes only a microscopic layer of clear coat and leaves the paint beneath untouched. The risk comes from using it dry, on a dirty surface, or applying too much pressure. Always work on a clean, slightly damp panel with a foam applicator pad and follow up with polish and wax.
Run your fingernail across the damaged area. If it catches a groove or ridge, the scratch has cut through the clear coat into the base color coat or primer. At that depth, no amount of compound or polish will fully correct it — the panel will need professional attention or a spot respray.
Only in extremely small, targeted amounts and with caution. Pure acetone in nail polish remover can dissolve your car's color coat if left on too long or applied too broadly. If you use it at all, dab it on a cotton ball and work only on the transfer — never let it pool on the surface. A dedicated automotive paint transfer remover is a far safer choice.
Fresh transfer within the first 24–48 hours responds well to WD-40 or rubbing compound. After about a week, the foreign paint cures and bonds more aggressively to the clear coat. You can still remove it, but you'll likely need to escalate from compound to wet sanding. Act as soon as you notice it.
Start with 2000 grit for moderate transfer and work up to 1500 grit only if needed for very stubborn spots. After the transfer is gone, step back up to 2500–3000 grit to refine the surface before polishing. Never use anything coarser than 1500 grit on automotive clear coat — you'll sand through it.
It depends on your policy. Comprehensive coverage typically covers vandalism (including graffiti), but paint transfer from a parking lot ding usually falls under collision coverage. Check your deductible before filing — if the repair costs less than your deductible, paying out of pocket and skipping the claim is smarter for keeping your rates down.
A dedicated automotive graffiti remover or lacquer thinner works fastest on spray paint. Apply it to a microfiber cloth — never directly to the car — and dab the affected area rather than scrubbing. Rinse immediately with water once the paint starts lifting. For large graffiti tags, a professional detailer with a machine polisher will get the job done faster and with less risk to your finish.


About Mike Constanza
For years, Mike had always told everyone "no other sport like baseball." True to his word, he keeps diligently collecting baseball-related stuff: cards, hats, jerseys, photos, signatures, hangers, shorts (you name it); especially anything related to the legendary player Jim Bouton.Mike honorably received Bachelor of Science degree in Business Administration from University of Phoenix. In his graduation speech, he went on and on about baseball... until his best friend, James, signaled him to shut it.He then worked for a domain registrar in Phoenix, AZ; speciallizng in auction services. One day at work, he saw the site JimBouton.com pop on the for-sale list. Mike held his breath until decided to blow all of his savings for it.Here we are; the site is where Mike expresses passion to the world. And certainly, he would try diversing it to various areas rather than just baseball.
You can get FREE Gifts. Or latest Free phones here.
Disable Ad block to reveal all the info. Once done, hit a button below
 im
im